一、Golang 第一印象
官网: https://go.dev/
-
高性能、高并发
- Google 出品
- 性能媲美C++、JAVA
- Go VS C++: Go programs versus C++ g++ | go-vs-cpp (C++ 略快)
- Go VS Java: Go programs versus Java | go-vs-java (Go 略快)
- 内置 goroutines ,天生适合并发,适合 Web 场景
-
语法简单、学习曲线平缓
- 语法风格类似 C 系语言,关键字只有 25 个,新人很容易上手,基本有C系语言基础,一天即可写代码
-
标准库丰富
- 相比于其他语言,Golang 官方标准库非常丰富,见: https://studygolang.com/pkgdoc
- 在很多情况下,不需要借助第三方库即可完成大部分应用程序开发
-
工具链完善
- 编译
- 代码检查、代码格式化
- 包管理
- 单元测试、覆盖率测试
- …
-
静态链接
- 编译结果是静态链接的,只生成一个可执行文件,在容器环境下运行,镜像大小比较小,天然云原生
- C++ 生成的产物往往需要附加一堆
.so 文件才能运行
- Java 的产物必须至少附加 Java Runtime 才能运行
-
快速编译
- 在静态语言中,Go语言的编译速度比较快(大型CPP项目编译时间为数个小时起步
-
跨平台
- Golang 跨平台机制很完善,不仅支持 win/linux/mac ,甚至可以在各种嵌入式场景中运行,比如路由器、树莓派等
- 内置交叉编译工具,很容易跨平台编译
-
垃圾回收
- 和Java类似,开发者无需考虑内存释放,专注业务逻辑
二、八卦: 字节跳动为什么选Go
这个话题甚至在知乎有问题
为什么字节跳动选择使用 Go 语言? - 知乎 https://www.zhihu.com/question/353085825
据我多方搜索,最靠谱的答案应该是这个:
总结来说:
-
Go容易上手、性能与 C/C++ 只差两三倍
-
业务尝试(推送系统,对象存储)
-
公司搞 RPC 框架 Kite
-
初代程序员不喜欢java, python的性能比较低,C++不太适合在线web业务。在16年左右时选择golang并非一个很奇怪的决定
三、知识分享
进入正题,本次分享的对象是校招同学,大家普遍已经入职比较久了,基础的 Golang 语法肯定都已经熟悉了解了,线上的服务应该也写过不少,本次分享我们就略过这部分。
本次分享,我们主要探讨一些,在业务开发中,Golang 的一些特性 和 一些值得关注的点。
3.1 常用数据结构 - Slice
3.1.1 基础介绍
在业务开发中 切片(slice) 可能是我们最频繁使用的一个数据结构之一,我们都知道 go 有个类型叫做 数组(array) ,而 slice 就是在 array 之上抽象的一个数据类型,数组类型包含长度和元素类型。 数组的长度是固定的,长度是数组类型的一部分,长度不同的2个数组是不可以相互赋值的,因为这两个数组属于不同类型。Golang 有一个特点,一切都是值传递,当一个数组变量被赋值或者传递时,会复制整个数组,比如下面的代码,函数修改了 arr 中的元素,由于是值传递,数组本身并没有发生改变。
 1
 2
 3
 4
 5
 6
 7
 8
 9
10
11
|
func square(arr [3]int) {
    for i, num := range arr {
        arr[i] = num + 1
    }
}
func main() {
    arr := [3]int{1, 2, 3}
    square(arr)
    fmt.Println(arr)
}
// output: [1 2 3]
|
数组最大的缺点就是缺乏灵活性,在业务开发中,我们一般是不知道一个数组是需要多长的,需要他灵活可变,所以 go 里面有一个更方便的类型 切片(slice)。
首先来看看切片的定义 go/src/reflect/value.go
 1
 2
 3
 4
 5
 6
 7
 8
 9
10
11
|
// SliceHeader is the runtime representation of a slice.
// It cannot be used safely or portably and its representation may
// change in a later release.
// Moreover, the Data field is not sufficient to guarantee the data
// it references will not be garbage collected, so programs must keep
// a separate, correctly typed pointer to the underlying data.
type SliceHeader struct {
    Data uintptr
    Len  int
    Cap  int
}
|
我们可以使用 Go 自带的 len() 和 cap() 函数来查看一个 slice 的长度和最大容量
那我们把上面的代码,用 slice 做改造:
 1
 2
 3
 4
 5
 6
 7
 8
 9
10
11
|
func square(arr []int) {
    for i, num := range arr {
        arr[i] = num + 1
    }
}
func main() {
    arr := []int{1, 2, 3}
    square(arr)
    fmt.Println(arr)
}
// output: [2 3 4]
|
可以发现,arr 中的元素已经改了,由于 golang 是值传递,那就是把一个 slice 结构复制到了传递的函数参数中,成本较低,因为 Data 是一个指针。
3.1.2 初始化
切片的初始化方式一般有三种:
-
通过下标的方式获得数组或者切片的一部分: arr[0:3] or slice[0:3]
-
使用字面量初始化新的切片: slice := []int{1, 2, 3}
-
使用关键字 make 来创建切片: slice := make([]int, 10)
如下图是 x := []int{2,3,5,7,11} 和 y := x[1:3] 两个切片对应的内存结构。
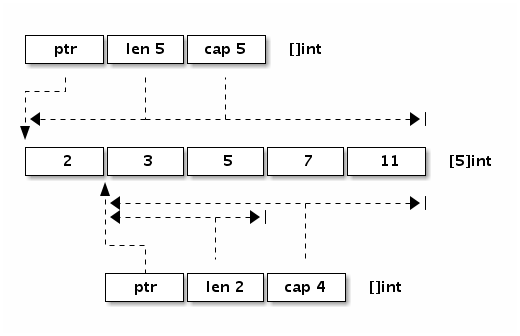
需要注意的是,由于 y 是通过下标的方式获得了 x 的一部分,虽然数据只有 [1:3],但是 cap 是 4,同时,如果对 y 进行 append 操作,在 cap 没有消耗完之前,改变的数据实际上是对 x 也生效的,举个例子:
 1
 2
 3
 4
 5
 6
 7
 8
 9
10
11
12
13
14
|
func main() {
    x := []int{2, 3, 5, 7, 11}
    y := x[1:3]
    fmt.Println("x:", x, len(x), cap(x))
    fmt.Println("y:", y, len(y), cap(y))
    y = append(y, 13, 14)
    fmt.Println("x:", x, len(x), cap(x))
    fmt.Println("y:", y, len(y), cap(y))
}
// output:
// x: [2 3 5 7 11] 5 5
// y: [3 5] 2 4
// x: [2 3 5 13 14] 5 5
// y: [3 5 13 14] 4 4
|
y作为x[1:3]的切片,我们给 y 后面 append 了两个元素 13 14,观察得知,本来x最后两个元素是 7 11,现在也变成了13 14.
我们把这个代码,稍微改改,再观察一下:
 1
 2
 3
 4
 5
 6
 7
 8
 9
10
11
12
13
14
15
|
func main() {
    x := []int{2, 3, 5, 7, 11}
    y := x[1:3]
    fmt.Println("x:", x, len(x), cap(x))
    fmt.Println("y:", y, len(y), cap(y))
    y = append(y, 13, 14, 15)
    fmt.Println("x:", x, len(x), cap(x))
    fmt.Println("y:", y, len(y), cap(y))
}

// output:
// x: [2 3 5 7 11] 5 5
// y: [3 5] 2 4
// x: [2 3 5 7 11] 5 5
// y: [3 5 13 14 15] 5 8
|
相比于第一个代码,我们只是给 y 多 append 了个元素 15,append 之后, x 的元素并没有改变,但是 y 变了,cap 也变了,原因是触发了 slice 的扩容策略,因为 y 的 cap 是 4 ,而我们增加 3 个元素后,需要的最小的 cap 是 5 ,那么空间就不够了,append 操作会开辟一段新的空间,把 y 原来的元素复制到新的位置,然后 cap 也会随之增长。
细心的同学可能发现了,增加3个元素之后,cap 为 5 不就够了,那为啥这里是 8 ,这就是下一个问题,我们需要讨论一下 slice 的扩容机制
3.1.3 扩容机制
Slice 是一个动态数组,那么在进行 append 操作时就会引发扩容,我们来看一下 slice 的扩容机制,我们可以在 $GOROOT/src/runtime/slice.go中找到关于 slice 是如何扩容的。
growthslice 传入一个类型,需要扩容的旧切片,以及期望这个切片有的最小容量,返回一个至少具有该容量的新切片。
 1
 2
 3
 4
 5
 6
 7
 8
 9
10
11
12
13
14
15
16
17
18
19
20
21
22
23
24
25
26
27
28
29
|
// go1.18
func growslice(et *_type, old slice, cap int) slice {
    // 省略。。。
    newcap := old.cap
    doublecap := newcap + newcap
    if cap > doublecap {
        newcap = cap
    } else {
        const threshold = 256
        if old.cap < threshold {
            newcap = doublecap
        } else {
            // Check 0 < newcap to detect overflow
            // and prevent an infinite loop.
            for 0 < newcap && newcap < cap {
                // Transition from growing 2x for small slices
                // to growing 1.25x for large slices. This formula
                // gives a smooth-ish transition between the two.
                newcap += (newcap + 3*threshold) / 4
            }
            // Set newcap to the requested cap when
            // the newcap calculation overflowed.
            if newcap <= 0 {
                newcap = cap
            }
        }
    }
    // 省略...
}
|
上图的代码是go1.18后的新的扩容策略,在这之前,扩容的代码为:
 1
 2
 3
 4
 5
 6
 7
 8
 9
10
11
12
13
14
15
16
|
//老版本
newcap := old.cap
if newcap+newcap < cap {
    newcap = cap
} else {
    for {
        if old.len < 1024 {
            newcap += newcap
        } else {
            newcap += newcap / 4
        }
        if newcap >= cap {
            break
        }
    }
}
|
可以看出来,新老共用的策略是:
- 如果把老的容量翻倍都不够容纳新的元素,那么新的 cap 直接置为所需要的最小的真实 cap
如果需要的新的 cap 小于老的容量翻倍,则:
老版本的扩容策略是:
-
当 cap < 1024 时,直接翻倍
-
当 cap >= 1024 时,每次扩1.25倍
而在 go1.18 以后 go官方觉得这个策略可能有一点激进,把基准阈值改成了 256,并且改变了增长公式为,使之增长更平滑。
1
|
newcap += (newcap + 3*threshold) / 4
|
3.1.4 总结
当一些场景对性能有要求时,如果我们频繁的对 slice 进行 append,会影响程序执行效率,因为每一次进行扩容是有开销的,涉及内存分配与复制,所以当遇到大量写 slice 的场景,尽量使用 make 预先分配内存。
3.2 常用数据结构 - map
3.2.1 哈希表
map 是 go 里面的核心数据结构之一,也是我们频繁使用的一个数据结构,我们通常使用 map 的场景是在里面存一些键值对信息来帮助我们完成一些业务逻辑,以 O(1) 的时间复杂度,快速的通过一个 key 来找到存储的信息。
map 的底层是使用哈希表来进行实现的,而提到哈希表,大家肯定都很熟悉,一般有几个关键点,比如哈希函数和冲突解决。
哈希函数的选择在很大程度上能够决定哈希表的读写性能。在理想情况下,哈希函数应该能够将不同键映射到不同的索引上,这要求哈希函数的输出范围大于输入范围,但是由于键的数量会远远大于映射的范围,所以在实际使用时,这个理想的效果是不可能实现的。比较实际的方式是让哈希函数的结果能够尽可能的均匀分布,然后通过工程上的手段解决哈希碰撞的问题。
golang 使用的 hash 算法和 CPU 有关,如果 CPU 支持 aes,那么使用 aes hash,否则使用 memhash。
那么发生哈希碰撞,就牵扯到冲突解决,我们一般用两种办法来解决哈希冲突:
大家可能都注意到了,不论是开放地址法,还是拉链法,如果产生冲突,都需要把元素加到哈希函数计算的地址后面,区别是内存空间前者是使用现有的, 后者是动态开辟的。
哈希表中有一个概念叫做 负载因子:
$$负载因子 = 元素数量 ➗ 桶数量$$
随着负载因子的增加,开放地址法线性探测时间会增加,当负载达到 100% 时,哈希表的时间复杂度退化到 O(n);拉链法也是一样,负载因子越大,哈希表的读写性能越差。所以一般解决的办法是哈希扩容,创建更多的桶来存储哈希表中的元素。
那么怎么扩容呢?
-
首先我们肯定要分配更多的桶
-
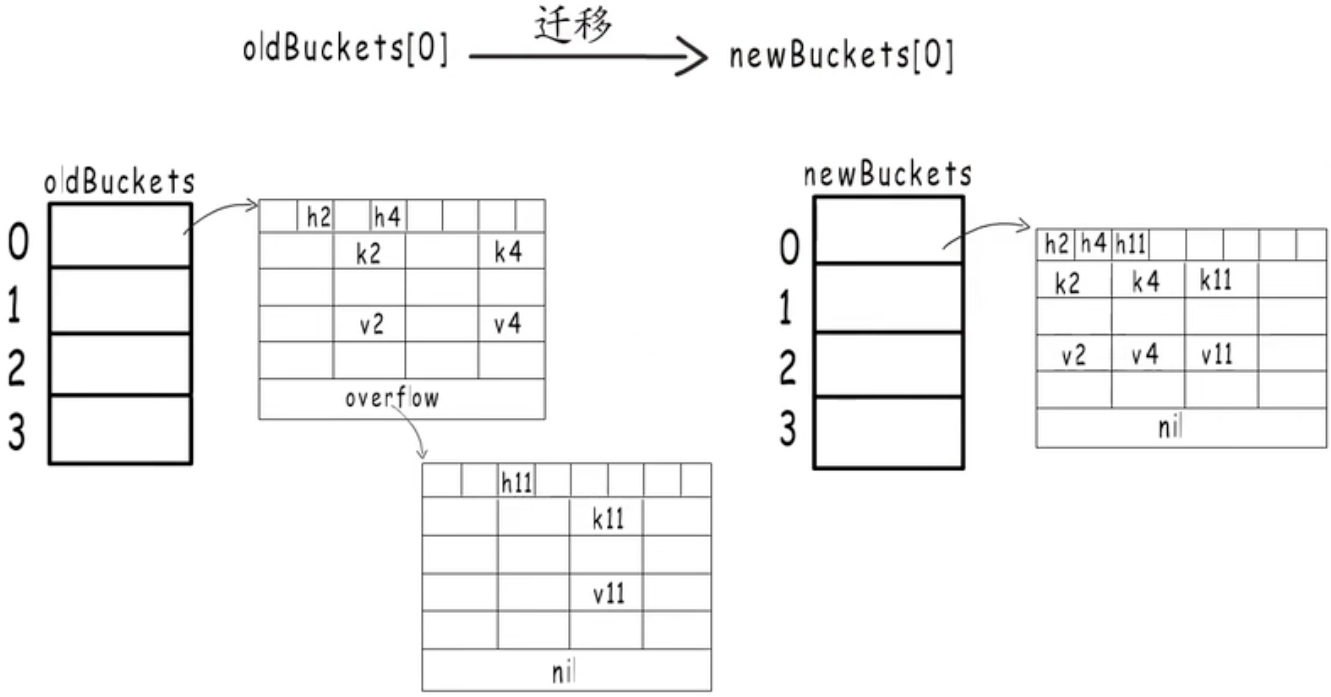
新的桶创建完成后,需要把旧桶中的元素,全部迁移到新桶中,一次性迁移所有的桶花费的时间比较比较多,所以我们一般的做法是先把新桶创建出来,然后找两个字段来记录:
- 旧桶的位置
- 旧桶迁移的进度,如记录旧桶编号
-
在哈希表每次进行读写操作时,如果发现当前是在扩容阶段,就完成一部分键值对迁移任务,直到旧桶迁移完成.
这种把键值对迁移的时间分摊到多次哈希表操作中的方式,我们称之为「渐进式扩容」,可以避免一次性扩容带来的性能瞬时抖动。
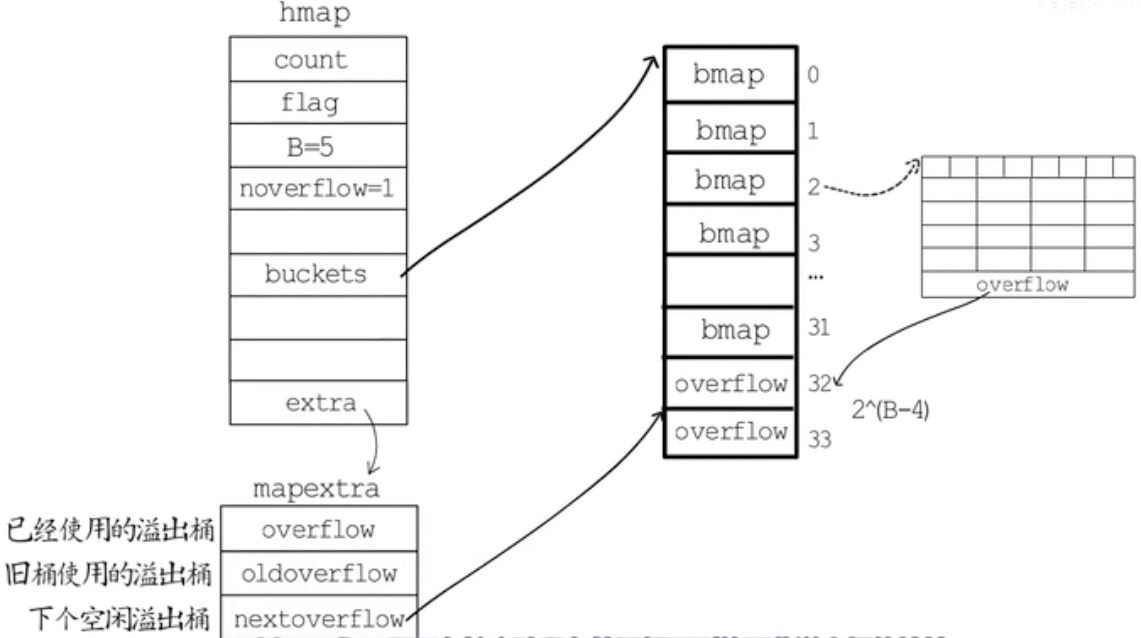
3.2.2 map 数据结构
在 golang 中,map 变量的本质是一个指针,指向 hmap 结构体,使用 拉链法+数组 来实现,Golang 的 map 定义在 $GOROOT/src/runtime/map.go 中
 1
 2
 3
 4
 5
 6
 7
 8
 9
10
11
12
13
14
15
16
|
// A header for a Go map.
type hmap struct {
    // Note: the format of the hmap is also encoded in cmd/compile/internal/reflectdata/reflect.go.
    // Make sure this stays in sync with the compiler's definition.
    count     int // # live cells == size of map.  Must be first (used by len() builtin)
    flags     uint8
    B         uint8  // log_2 of # of buckets (can hold up to loadFactor * 2^B items)
    noverflow uint16 // approximate number of overflow buckets; see incrnoverflow for details
    hash0     uint32 // hash seed

    buckets    unsafe.Pointer // array of 2^B Buckets. may be nil if count==0.
    oldbuckets unsafe.Pointer // previous bucket array of half the size, non-nil only when growing
    nevacuate  uintptr        // progress counter for evacuation (buckets less than this have been evacuated)

    extra *mapextra // optional fields
}
|
-
count 表示当前哈希表中的元素数量;
-
B 表示当前哈希表持有的桶 buckets 数量,但是因为哈希表中桶的数量都 2 的倍数,所以该字段会存储对数,也就是 len(buckets) == 2^B;(因为选择桶时用的是与运算的方法)
-
hash0 是哈希的种子,它能为哈希函数的结果引入随机性,这个值在创建哈希表时确定,并在调用哈希函数时作为参数传入;
-
buckets 记录桶在哪。指向 bucket 首地址的指针
-
oldbuckets 用于在扩容阶段保存旧桶在哪。
-
nevacuate 渐进式扩容阶段下一个要迁移的旧桶的编号
map 使用的桶的结构为 bmap:
 1
 2
 3
 4
 5
 6
 7
 8
 9
10
11
12
13
14
15
16
17
18
19
20
21
22
23
24
25
26
27
28
29
30
|
// bucketCnt=8
// A bucket for a Go map.
type bmap struct {
    // tophash generally contains the top byte of the hash value
    // for each key in this bucket. If tophash[0] < minTopHash,
    // tophash[0] is a bucket evacuation state instead.
    tophash [bucketCnt]uint8
    // Followed by bucketCnt keys and then bucketCnt elems.
    // NOTE: packing all the keys together and then all the elems together makes the
    // code a bit more complicated than alternating key/elem/key/elem/... but it allows
    // us to eliminate padding which would be needed for, e.g., map[int64]int8.
    // Followed by an overflow pointer.
}

// mapextra holds fields that are not present on all maps.
type mapextra struct {
    // If both key and elem do not contain pointers and are inline, then we mark bucket
    // type as containing no pointers. This avoids scanning such maps.
    // However, bmap.overflow is a pointer. In order to keep overflow buckets
    // alive, we store pointers to all overflow buckets in hmap.extra.overflow and hmap.extra.oldoverflow.
    // overflow and oldoverflow are only used if key and elem do not contain pointers.
    // overflow contains overflow buckets for hmap.buckets.
    // oldoverflow contains overflow buckets for hmap.oldbuckets.
    // The indirection allows to store a pointer to the slice in hiter.
    overflow    *[]*bmap
    oldoverflow *[]*bmap

    // nextOverflow holds a pointer to a free overflow bucket.
    nextOverflow *bmap
}
|
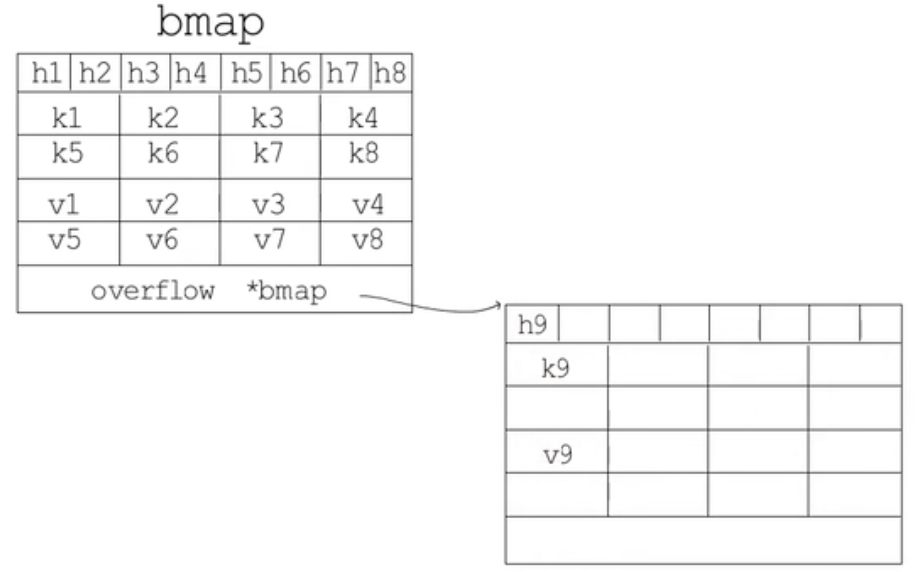
如果哈希表要分配的桶的数目大于 2^4 ,就认为使用到溢出桶的几率较大,就会预分配 2^(B-4) 个溢出桶备用,这些溢出桶与常规桶在内存中是连续的,只是前 2^B 用作常规桶,后面的用作溢出桶。
hmap 最后一个字段是 mapextra,其中:
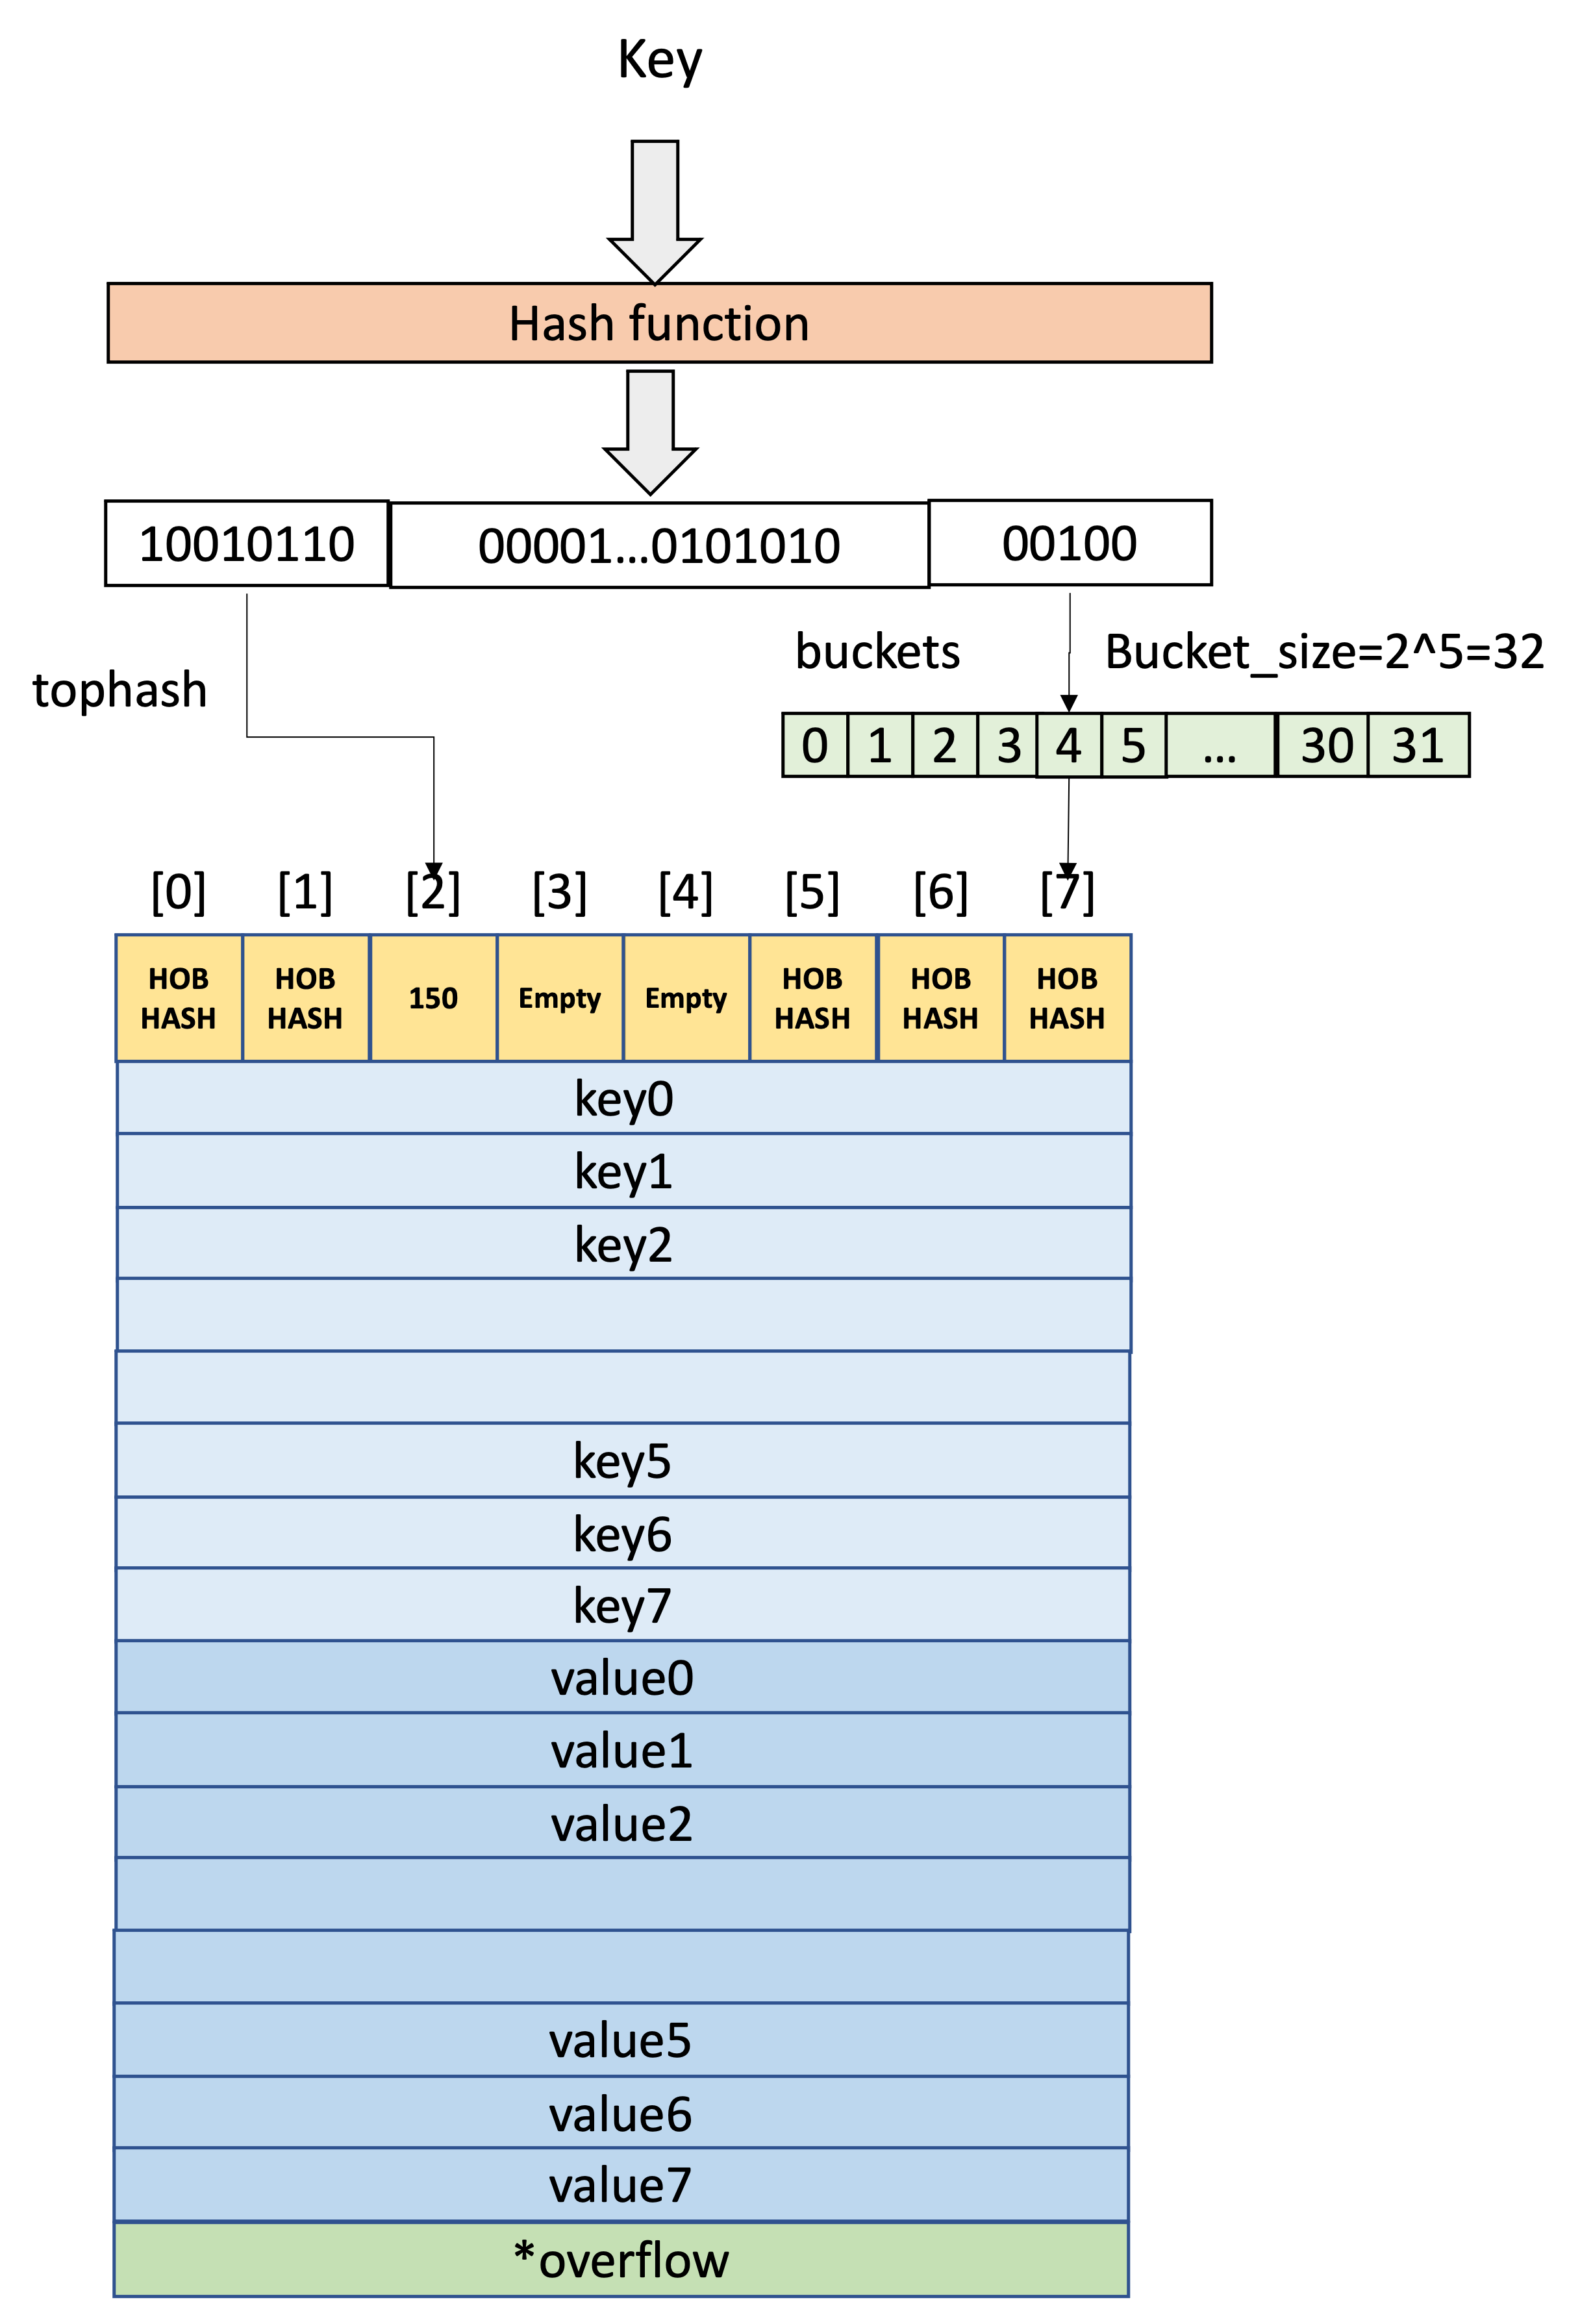
3.2.3 读取
我们要取 map 中一个 key 的 value,需要进行两个步骤:
-
找到数据落到哪个bucket中
-
确定 bucket 中的具体位置
在 golang 中,map 根据哈希函数给 key 生成一个哈希值,其中:低位哈希用来判断这个key存储在哪个桶中,高位哈希用来确定这个key在桶的哪个槽。
通过一个例子来说明,假定B = 5,所以bucket总数就是 2^5 = 32。
如果在 bucket 中没找到,并且overflow不为空,则继续去overflow bucket中寻找,直到找到key或所有的key槽位都找遍了,包括所有的overflow bucket。
源码分析:
对于 map 我们一般使用两种方式来拿map 的值:
1
2
|
v     := hash[key] // => v     := *mapaccess1(maptype, hash, &key)
v, ok := hash[key] // => v, ok := mapaccess2(maptype, hash, &key)
|
赋值语句左侧接受参数的个数会决定使用的运行时方法:
这两个函数定义为:
1
2
|
func mapaccess1(t *maptype, h *hmap, key unsafe.Pointer) unsafe.Pointer
func mapaccess2(t *maptype, h *hmap, key unsafe.Pointer) (unsafe.Pointer, bool)
|
我们来看一下第一个函数
 1
 2
 3
 4
 5
 6
 7
 8
 9
10
11
12
13
14
15
16
17
18
19
20
21
22
23
24
25
26
27
28
29
30
31
32
33
34
35
36
37
38
39
40
41
42
43
44
45
46
47
48
49
50
51
52
53
54
55
56
57
58
59
60
61
62
63
64
65
66
|
func mapaccess1(t *maptype, h *hmap, key unsafe.Pointer) unsafe.Pointer {
        // 如果map为空,返回0值
        if h == nil || h.count == 0 {
                if t.hashMightPanic() {
                        t.hasher(key, 0)
                }
                return unsafe.Pointer(&zeroVal[0])
        }
        // 如果该map状态为写状态,panic
        if h.flags&hashWriting != 0 {
                throw("concurrent map read and map write")
        }
        // 获取key的hash,并根据hash和桶掩码在桶数组找到对应的桶
        hash := t.hasher(key, uintptr(h.hash0))
        m := bucketMask(h.B)
        b := (*bmap)(add(h.buckets, (hash&m)*uintptr(t.bucketsize)))

        // 如果正在扩容,判断要去新桶中找还是旧桶中找
        if c := h.oldbuckets; c != nil {
                // 如果是双倍扩容,在查找旧桶时,应当使用旧桶的掩码
                if !h.sameSizeGrow() {
                        m >>= 1
                }
                // 根据hash和桶掩码在旧桶数组找到对应的桶
                oldb := (*bmap)(add(c, (hash&m)*uintptr(t.bucketsize)))
                // 如果当前的桶还在旧桶中,还没被迁移,本次查找应当在旧桶中查找
                // 这是根据桶的tophash[0]的状态位来判断的
                if !evacuated(oldb) {
                        b = oldb
                }
        }
        // 根据hash获取tophash
        top := tophash(hash)
bucketloop:
        // 依次遍历桶以及溢出桶
        for ; b != nil; b = b.overflow(t) {
                // 在桶内,遍历桶内的8个槽
                for i := uintptr(0); i < bucketCnt; i++ {
                        // 如果槽与键的tophash不相同,判断槽的tophash状态位
                        // 如果是“后继空状态”就直接提前退出返回零值。
                        // 否则就继续遍历下一个槽。
                        if b.tophash[i] != top {
                                if b.tophash[i] == emptyRest {
                                        break bucketloop
                                }
                                continue
                        }
                        // 如果槽与键的tophash相同,说明可能找到了
                        k := add(unsafe.Pointer(b), dataOffset+i*uintptr(t.keysize))
                        if t.indirectkey() {
                                k = *((*unsafe.Pointer)(k))
                        }
                        // 再判断查找的键与存储的键是否是一样的
                        // 不一样就继续遍历下一个槽。
                        // 一样的话,就取出值并返回。
                        if t.key.equal(key, k) {
                                e := add(unsafe.Pointer(b), dataOffset+bucketCnt*uintptr(t.keysize)+i*uintptr(t.elemsize))
                                if t.indirectelem() {
                                        e = *((*unsafe.Pointer)(e))
                                }
                                return e
                        }
                }
        }
        return unsafe.Pointer(&zeroVal[0])
}
|
两个函数流程基本一样:
-
判断map是否为空,空则直接返回零值
-
判断该map的状态,如果正在写,则panic
-
获取key的hash值,并根据掩码找到对应的桶
-
判断当前是否正在扩容
- 根据旧桶的掩码找到key在旧桶数组的桶位置
- 该旧桶位置是否已经被迁移
- 如果被迁移,接下来的查找在新桶中查找
- 如果没迁移,接下来的查找在旧桶中查找
-
依次遍历桶以及溢出桶来查找key
- 在桶内依次遍历8个槽
- 判断槽的tophash是否与key的tophash相同
- 不同就判断状态位是否是“后继空状态”。
- “后继空状态”说明这个key在以后的槽中也没有,这个key不存在,直接返回零值
- 不是“后继空状态”,就继续去下一个槽里找
- 相同的tophash就对比key是否一样
- 如果一样,返回对应的值
- 如果不一样,就继续去下一个槽里找
-
遍历完桶以及溢出桶还没找到key,说明不存在,返回零值
3.2.4 写入
map 的插入基本遵循以下流程:
-
根据 key 计算出哈希值
-
根据哈希值低位确定所在 bucket
-
根据哈希值高 8 位确定在 bucket 中的存储位置
-
查找该 key 是否存在,已存在则更新,不存在则插入
源码分析:
数据的写入在函数 mapassign 中实现:
  1
  2
  3
  4
  5
  6
  7
  8
  9
 10
 11
 12
 13
 14
 15
 16
 17
 18
 19
 20
 21
 22
 23
 24
 25
 26
 27
 28
 29
 30
 31
 32
 33
 34
 35
 36
 37
 38
 39
 40
 41
 42
 43
 44
 45
 46
 47
 48
 49
 50
 51
 52
 53
 54
 55
 56
 57
 58
 59
 60
 61
 62
 63
 64
 65
 66
 67
 68
 69
 70
 71
 72
 73
 74
 75
 76
 77
 78
 79
 80
 81
 82
 83
 84
 85
 86
 87
 88
 89
 90
 91
 92
 93
 94
 95
 96
 97
 98
 99
100
101
102
103
104
105
106
107
108
109
110
111
112
113
114
115
116
117
118
119
120
121
122
123
124
125
126
127
128
129
130
131
|
func mapassign(t *maptype, h *hmap, key unsafe.Pointer) unsafe.Pointer {
    // 空map不可写,
    if h == nil {
        panic(plainError("assignment to entry in nil map"))
    }
    // 如果map正在被写,panic
    if h.flags&hashWriting != 0 {
        throw("concurrent map writes")
    }
    // 计算key的hash
    hash := t.hasher(key, uintptr(h.hash0))

    // 置map写状态
    h.flags ^= hashWriting

    // 如果桶数组为空,初始化桶数组
    if h.buckets == nil {
        h.buckets = newobject(t.bucket)
    }

again:
    // 根据key的hash值计算目标桶的位置
    bucket := hash & bucketMask(h.B)
    // 如果正在扩容,不但要把自己将要使用的桶的数据迁移掉
    // 还需要再帮忙迁移一个桶的数据
    if h.growing() {
        growWork(t, h, bucket)
    }
    // 获取到目标桶的指针,如果在扩容的话,到这一步已经是迁移到新桶数组中了
    b := (*bmap)(add(h.buckets, bucket*uintptr(t.bucketsize)))
    // 计算tophash
    top := tophash(hash)

    var inserti *uint8         // 插入或修改目标的槽的tophash指针
    var insertk unsafe.Pointer // 插入或修改目标的槽的key指针
    var elem unsafe.Pointer    // 插入或修改目标的槽的val指针
bucketloop: // 主要是查找map中是否已经存在该key了
    for {
        // 遍历桶中的8个槽
        for i := uintptr(0); i < bucketCnt; i++ {
            // 如果槽与key的tophash不等
            if b.tophash[i] != top {
                // 判断槽的tophash是否是空的
                // 如果是空的,那就说明找到了目标的候选插入位置了
                if isEmpty(b.tophash[i]) && inserti == nil {
                    inserti = &b.tophash[i]
                    insertk = add(unsafe.Pointer(b), dataOffset+i*uintptr(t.keysize))
                    elem = add(unsafe.Pointer(b), dataOffset+bucketCnt*uintptr(t.keysize)+i*uintptr(t.elemsize))
                }
                // 如果此槽的状态位为“后继空状态”,说明这个key在此之前没有插入过
                // 刚刚的候选插入位置就是真实的插入位置,退出最外层的for循环
                if b.tophash[i] == emptyRest {
                    break bucketloop
                }
                // 槽与key的tophash不相等,遍历下一个槽
                continue
            }
            // 槽与key的tophash相同,获取到槽对应的key并进行对比
            k := add(unsafe.Pointer(b), dataOffset+i*uintptr(t.keysize))
            if t.indirectkey() {
                k = *((*unsafe.Pointer)(k))
            }
            // 虽然tophash相同,但是key不同,继续遍历下一个槽
            if !t.key.equal(key, k) {
                continue
            }
            // 找到Key了,将新的val更新到该槽中,然后直接跳到收尾操作
            if t.needkeyupdate() {
                typedmemmove(t.key, k, key)
            }
            elem = add(unsafe.Pointer(b), dataOffset+bucketCnt*uintptr(t.keysize)+i*uintptr(t.elemsize))
            goto done
        }
        // 遍历下一个溢出桶
        ovf := b.overflow(t)
        if ovf == nil {
            break
        }
        b = ovf
    }

    // 到这一步说明没有在map中找到key,要新增一个KV对
    // 判断是否满足扩容条件
    // 如果满足,先做好扩容准备,返回again再查一次
    if !h.growing() && (overLoadFactor(h.count+1, h.B) || tooManyOverflowBuckets(h.noverflow, h.B)) {
        hashGrow(t, h)
        goto again
    }

    // 到这一步说明,在map中既没找到key
    // 在key对应的桶和溢出桶中也没找到空的槽
    // 应当申请一个新的溢出桶
    if inserti == nil {
        // 申请一个新的溢出桶
        // 将inserti,insertk,elem全部指向新的溢出桶的第一个槽
        newb := h.newoverflow(t, b)
        inserti = &newb.tophash[0]
        insertk = add(unsafe.Pointer(newb), dataOffset)
        elem = add(insertk, bucketCnt*uintptr(t.keysize))
    }

    // 在insertk,elem中存下新的KV对
    if t.indirectkey() {
        kmem := newobject(t.key)
        *(*unsafe.Pointer)(insertk) = kmem
        insertk = kmem
    }
    if t.indirectelem() {
        vmem := newobject(t.elem)
        *(*unsafe.Pointer)(elem) = vmem
    }
    typedmemmove(t.key, insertk, key)
    // 将inserti的值更新为key的tophash
    *inserti = top
    // 字典元素数量++
    h.count++

done: // 此时元素已经插入或更新完毕,收尾工作
    // 此时又相当于乐观锁
    // 再次判断map是否正在被写入,预期是正在被写入
    // 如果不是正在写入,说明并发写了,panic
    if h.flags&hashWriting == 0 {
        throw("concurrent map writes")
    }
    // 清map的写状态
    h.flags &^= hashWriting
    if t.indirectelem() {
        elem = *((*unsafe.Pointer)(elem))
    }
    return elem
}
|
3.2.3 扩容
翻倍扩容是由于桶不够了,为啥要进行等量扩容?因为使用了多过的溢出桶,然后 map 删除了大量的键值对,这种情况等量扩容后,可以使 map 排列的更加紧凑,节省空间。
map 的等量扩容,有个细节:
- 在等量扩容的时候,只是把旧桶中排列比较稀疏的kv,迁移到了新桶中。扩容完成后由GC去释放旧桶的所占用空间,但是我们要注意,无论是翻倍扩容还是等量扩容,这个 B 的值是越来越大的,go 没有任何机制去主动缩小这个 B,则 hmap 的结构体所占用的内存会越来越大,很容易引起内存泄漏,所以开发时如果遇到一个map需要存很大数量的kv,却只是临时使用,需要开发者手动管理。
可以使用一种 trick 的办法:
1
2
3
4
5
6
7
|
oldMap := make(map[int]int, 100000)

newMap := make(map[int]int, len(oldMap))
for k, v := range oldMap {
    newMap[k] = v
}
oldMap = newMap
|
让 GC 去回收旧内存。
Map 为啥没有缩容呢? 来自: Go map 如何缩容?
-
《runtime: shrink map as elements are deleted》
-
《proposal: runtime: add way to clear and reuse a map’s working storage》
目前 map 的缩容处理起来比较棘手,最早的 issues 是 2016 年提出的,也有人提过一些提案,但都因为种种原因被拒绝了。
简单来讲,就是没有找到一个很好的方法实现,存在明确的实现成本问题,没法很方便的 ”告诉“ Go 运行时,我要:
-
记得保留存储空间,我要立即重用 map。
-
赶紧释放存储空间,map 从现在开始会小很多。
抽象来看症结是:需要保证增长结果在下一个开始之前完成,此处的增长指的是 ”从小到大,从一个大小到相同大小,从大到小“ 的复杂过程。
这属于一个多重 case,从而导致也就一直拖着,慢慢想。
3.2.4 总结
-
golang 的 map 是哈希表实现的
-
哈希表结构体名字叫做 hmap,其中桶的存储结构叫 bmap,一个桶里最多存 8 个key
-
一个 hmap 里面桶的数量是 2^B 个,为了防止桶不够用还引入了 溢出桶 概念
-
读取、写入规则首先是通过 key 计算出来哈希值,其中低位哈希用来判断这个key存储在哪个桶中,高位哈希用来确定这个key在桶的哪个槽。
-
由于 map 存在扩容机制,我们在日常开发使用 map 的事实,不可对 map 的元素取地址,因为扩容后,元素的地址会改变,使获取的地址无效。
-
遍历 map 是无序的,map 的增长扩容会导致重新进行散列,这就可能使 map 的遍历结果在扩容前后变得不可靠, Go 设计者为了让大家不依赖遍历的顺序,故意在实现 map 遍历时加入了随机数, 让每次遍历的起点–即起始 bucket 的位置不一样,即不让遍历都从 bucket0 开始, 所以即使未扩容是我们遍历出来的 map 也总是无序的。
-
map 不是并发安全的,如果需要安全的并发,可以用 sync.Map 来实现,map 支持并发读,但是不支持并发写,并发写会 panic
-
map 存入大量 KV 由于扩容机制使占用内存越来越大,容易 OOM,开发者应按照需求,合理使用 map
3.3 Context
我们在日常开发中,我们总是会将函数的第一个参数写为 ctx context.Context ,更多的时候,我们只是把它一层层向下透传,而没有深究里面都有什么,今天我们来探究一下 context 是什么,有什么用。
3.3.1 Context 是什么
Context ,翻译成中文意思就是上下文,描述着我们完成一件事情的一个完整的生命周期,在请求链路的上下文信息传递扮演了重要的角色。
根据官方文档的说法,该类型被设计用来在API边界之间以及过程之间传递截止时间、取消信号及其他与请求相关的数据。Context实际上是一个接口,提供了4个方法,在标准库中的定义为 $GOROOT/src/context/context.go:
1
2
3
4
5
6
7
|
// Context's methods may be called by multiple goroutines simultaneously.
type Context interface {
        Deadline() (deadline time.Time, ok bool)
        Done() <-chan struct{}
        Err() error
        Value(key interface{}) interface{}
}
|
这几个方法是context思想的核心:
-
Deadline():用来返回 ctx 的截止时间,ok 为 false 表示没有设置。达到截止时间的 ctx 会被自动 Cancel 掉;
-
Done():如果当前ctx是可取消的,Done 返回一个chan用来监听,否则返回nil。当ctx被Cancel时,返回的chan会同时被close掉,也就变成“有信号”状态;
-
Err():如果 ctx 已经被 canceled,Err 会返回执行 Cancel 时指定的 error,否则返回 nil;
-
Value(): Value 用来从ctx中根据指定的 key 提取对应的 value;
-
Context可以互相嵌套,可以由父 Context 生成很多子 Context,最终形成一棵树
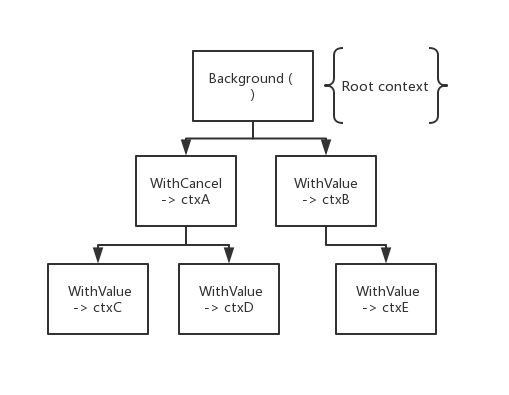
Context 中包含了“一个接口、四种具体实现、六个函数”,我们分别看一下 context 每一种具体实现的作用。
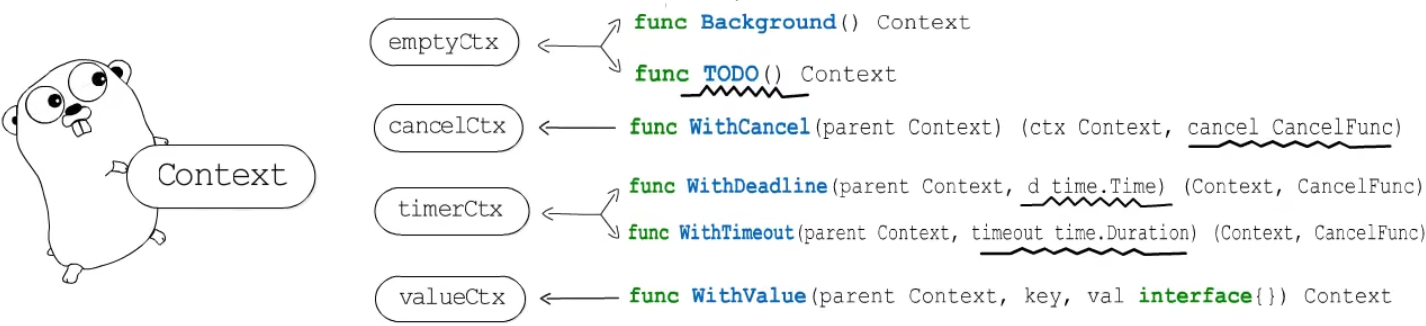
3.3.2 emptyCtx
标准库中定义了一个 emptyCtx ,并且实现了上面的 Context 接口:
 1
 2
 3
 4
 5
 6
 7
 8
 9
10
11
12
13
14
15
16
17
18
19
|
// An emptyCtx is never canceled, has no values, and has no deadline. It is not
// struct{}, since vars of this type must have distinct addresses.
type emptyCtx int

func (*emptyCtx) Deadline() (deadline time.Time, ok bool) {
    return
}

func (*emptyCtx) Done() <-chan struct{} {
    return nil
}

func (*emptyCtx) Err() error {
    return nil
}

func (*emptyCtx) Value(key any) any {
    return nil
}
|
可以看出默认都是空实现,还提供了两个生成 Context 的基础方法:
 1
 2
 3
 4
 5
 6
 7
 8
 9
10
11
12
13
14
15
16
17
18
19
20
|
var (
    background = new(emptyCtx)
    todo       = new(emptyCtx)
)

// Background returns a non-nil, empty Context. It is never canceled, has no
// values, and has no deadline. It is typically used by the main function,
// initialization, and tests, and as the top-level Context for incoming
// requests.
func Background() Context {
    return background
}

// TODO returns a non-nil, empty Context. Code should use context.TODO when
// it's unclear which Context to use or it is not yet available (because the
// surrounding function has not yet been extended to accept a Context
// parameter).
func TODO() Context {
    return todo
}
|
3.3.3 cancelCtx
cancelCtx 类型可以说是最核心的一个类型,它实现了 Cancel 操作和信号机制,以及 Context 父子关系关联,从而支持在父 Context Cancel 时同步 Cancel 所有子 Context,定义如下:
 1
 2
 3
 4
 5
 6
 7
 8
 9
10
11
12
13
|
type canceler interface {     //凡实现该接口的,都能够被cancel
        cancel(removeFromParent bool, err error)   //removeFromParent 代表是否从父context节点删除 (被父调用时传false)
        Done() <-chan struct{}
}

type cancelCtx struct {
    Context

    mu       sync.Mutex            // protects following fields
    done     atomic.Value          // of chan struct{}, created lazily, closed by first cancel call
    children map[canceler]struct{} // set to nil by the first cancel call
    err      error                 // set to non-nil by the first cancel call
}
|
其中:
WithCancel 可以生成一个可以被 cancel 的 context -> cancelCtx,定义如下:
 1
 2
 3
 4
 5
 6
 7
 8
 9
10
11
12
13
14
|
type CancelFunc func() // CancelFunc 是一个类型别名

func WithCancel(parent Context) (ctx Context, cancel CancelFunc) {
    if parent == nil {
        panic("cannot create context from nil parent")
    }
    c := newCancelCtx(parent) // 通过父节点生成子 context
    propagateCancel(parent, &c)
    return &c, func() { c.cancel(true, Canceled) }
}

func newCancelCtx(parent Context) cancelCtx {
    return cancelCtx{Context: parent}
}
|
- WithCancel 函数会基于传入的 parent 创建一个可以 Cancel 的 ctx,与 cancel 函数一起返回。调用cancel函数就会将这个新的
ctx Cancel 掉,所有基于此 ctx 创建的子孙 Context 也会一并被Cancel掉。
可以看一下 cancelCtx 怎么实现的 cancel 方法:
 1
 2
 3
 4
 5
 6
 7
 8
 9
10
11
12
13
14
15
16
17
18
19
20
21
22
23
24
25
26
27
28
29
|
// cancel closes c.done, cancels each of c's children, and, if
// removeFromParent is true, removes c from its parent's children.
func (c *cancelCtx) cancel(removeFromParent bool, err error) {
    if err == nil {
        panic("context: internal error: missing cancel error")
    }
    c.mu.Lock()
    if c.err != nil {
        c.mu.Unlock()
        return // already canceled
    }
    c.err = err
    d, _ := c.done.Load().(chan struct{})
    if d == nil {
        c.done.Store(closedchan) // 这里复用了一个全局变量 closedchan 一个已关闭的channel
    } else {
        close(d)
    }
    for child := range c.children {
        // NOTE: acquiring the child's lock while holding parent's lock.
        child.cancel(false, err)
    }
    c.children = nil
    c.mu.Unlock()

    if removeFromParent {
        removeChild(c.Context, c)
    }
}
|
-
首先关闭该节点 done
-
遍历所有子节点,递归取消
-
将子节点从父节点的引用中删除
c.done 是“懒汉式”创建,只有调用了 Done() 方法的时候才会被创建。直接调用读这个 channel,协程会被 block 住。一般通过搭配 select 来使用。一旦关闭,就会立即读出零值。
我们可以写代码来测试一下 WithCancel:
 1
 2
 3
 4
 5
 6
 7
 8
 9
10
11
12
13
14
15
16
17
18
19
20
21
22
23
24
25
26
27
28
|
func main() {
    var wg sync.WaitGroup
    ctx := context.Background()
    ctx1, cancel := context.WithCancel(ctx)

    wg.Add(1)
    go func() {
        defer wg.Done()
        tick := time.NewTicker(300 * time.Millisecond)
        for {
            select {
            case <-ctx1.Done():
                fmt.Println("1->", ctx1.Err())
                return
            case t := <-tick.C:
                fmt.Println("2->", t.Nanosecond())
            }
        }
    }()
    time.Sleep(time.Second)
    cancel()
    wg.Wait()
}
// output:
// 2-> 392622000
// 2-> 692955000
// 2-> 992950000
// 1-> context canceled
|
可以看出,我们首先创建了一个协程等待1秒后再去请求 cancel,协程中的定时器每隔 300ms 打印一次 2,直到 context 被 cancel 之后输出1
3.3.4 timerCtx
接下来看一下 timerCtx 的定义:
1
2
3
4
5
6
|
type timerCtx struct {
    cancelCtx
    timer *time.Timer // // 被cancelCtx.mu保护(并发保护)

    deadline time.Time
}
|
相比于 cancelCtx,多了两个字段 timer 和 deadline,那功能很明确,就是给一个 context 设置一个截止时间,到了截止时间就会触发 cancel。
生成 timerCtx 的方法有两个:
 1
 2
 3
 4
 5
 6
 7
 8
 9
10
11
12
13
14
15
16
17
18
19
20
21
22
23
24
25
26
27
28
29
30
31
|
func WithDeadline(parent Context, d time.Time) (Context, CancelFunc) {
    if parent == nil {
        panic("cannot create context from nil parent")
    }
    if cur, ok := parent.Deadline(); ok && cur.Before(d) {
        // The current deadline is already sooner than the new one.
        return WithCancel(parent)
    }
    c := &timerCtx{
        cancelCtx: newCancelCtx(parent),
        deadline:  d,
    }
    propagateCancel(parent, c)
    dur := time.Until(d)
    if dur <= 0 {
        c.cancel(true, DeadlineExceeded) // deadline has already passed
        return c, func() { c.cancel(false, Canceled) }
    }
    c.mu.Lock()
    defer c.mu.Unlock()
    if c.err == nil {
        c.timer = time.AfterFunc(dur, func() {
            c.cancel(true, DeadlineExceeded)
        })
    }
    return c, func() { c.cancel(true, Canceled) }
}

func WithTimeout(parent Context, timeout time.Duration) (Context, CancelFunc) {
    return WithDeadline(parent, time.Now().Add(timeout))
}
|
可以看一下 WithDeadline 和 WithTimeout 的代码,可以发现 WithTimeout 本质上是调用 WithDeadline来实现的,实现中依赖 go 标准库 timer 来实现定时器功能。
其被cancel的机制:
我们继续来用一个例子来做实验:
 1
 2
 3
 4
 5
 6
 7
 8
 9
10
11
12
13
14
15
16
17
18
19
20
21
22
23
24
25
26
27
|
func main() {
    var wg sync.WaitGroup
    ctx := context.Background()
    ctx2, cancel := context.WithDeadline(ctx, time.Now().Add(time.Second))
    defer cancel()

    wg.Add(1)
    go func() {
        defer wg.Done()
        tick := time.NewTicker(300 * time.Millisecond)
        for {
            select {
            case <-ctx2.Done():
                fmt.Println("1->", ctx2.Err())
                return
            case t := <-tick.C:
                fmt.Println("2->", t.Nanosecond())
            }
        }
    }()
    wg.Wait()
}
// output:
// 2-> 277306000
// 2-> 577292000
// 2-> 877306000
// 1-> context deadline exceeded
|
我们还是搞了一个 300ms 的定时器,区别是我们本次直接在定义 context 的时候就设置了 1s 的超时时间,到时间后就会接收到 <-ctx.Done() 的信号
3.3.5 valueCtx
我们再看一下 valueCtx,valueCtx的作用是在上下文中传递键值对。
1
2
3
4
|
type valueCtx struct {
    Context
    key, val any
}
|
valueCtx 的定义更简单,除了包了一层原始的 Context 外,就只有 k,v 这两个元素。valueCtx 是通过函数 WithValue 来创建的:
 1
 2
 3
 4
 5
 6
 7
 8
 9
10
11
12
|
func WithValue(parent Context, key, val any) Context {
    if parent == nil {
        panic("cannot create context from nil parent")
    }
    if key == nil {
        panic("nil key")
    }
    if !reflectlite.TypeOf(key).Comparable() {
        panic("key is not comparable")
    }
    return &valueCtx{parent, key, val}
}
|
可以看出,只是把我们需要存的kv存在了这个结构体中,那么取数据的时候需要调用 Value 方法:
 1
 2
 3
 4
 5
 6
 7
 8
 9
10
11
12
13
14
15
16
17
18
19
20
21
22
23
24
25
26
27
28
29
30
31
32
|
func (c *valueCtx) Value(key any) any {
    if c.key == key {
        return c.val
    }
    return value(c.Context, key)
}

func value(c Context, key any) any {
    for {
        switch ctx := c.(type) {
        case *valueCtx:
            if key == ctx.key {
                return ctx.val
            }
            c = ctx.Context
        case *cancelCtx:
            if key == &cancelCtxKey {
                return c
            }
            c = ctx.Context
        case *timerCtx:
            if key == &cancelCtxKey {
                return &ctx.cancelCtx
            }
            c = ctx.Context
        case *emptyCtx:
            return nil
        default:
            return c.Value(key)
        }
    }
}
|
非常直接,只有一个递归调用,如果自己的 context 中有这个key,就返回value,没有就递归的查自己的父节点。则会返回Background中定义的nil。还有一点,可以看到如果子context使用的key与之前的父context相同,则会覆盖其值。同时,这样的结构是子节点可以取到父节点的数据,但是父节点无法感知子节点的改动。
3.3.6 总结
说了这么多,我们小小的总结一下,Context 中一个很重要的方法是 Done(),返回了一个只读channel(同时还是无缓冲的阻塞channel),但是没有一个方法会向这个channel写数据。这里就运用了channel的一个特点:当一个channel被关闭之后,channel的读操作就会收到一个零值。也就是说,这个读操作除非在该channel被关闭的时候能读到数据,其他时候是读不到任何数据的。所以,在context的操作中,子协程读到数据后,就意味着整个ctx树被取消了,就要去做该做的事情了; 还有一个很巧妙的点在于,channel的关闭行为是广播性质的,也就是任何一个监听该channel读的操作都会收到一个零值,也就是所有该节点的子节点都会受到这个关闭状态。
了解了这些我们以后在业务代码中看见 Context 时,就知道应该如何把控它,牢记:一个接口、四个实现、六个函数
那 Context 这些函数的作用都有啥呢,我们可以直接看一下官方例子: $goroot/src/context/example_test.go
Case 1: 正确的使用cancel来避免goroutine泄露
 1
 2
 3
 4
 5
 6
 7
 8
 9
10
11
12
13
14
15
16
17
18
19
20
21
22
23
24
25
26
27
28
29
30
31
32
33
|
func ExampleWithCancel() {
    gen := func(ctx context.Context) <-chan int {
        dst := make(chan int)
        n := 1
        go func() {
            for {
                select {
                case <-ctx.Done():
                    return // returning not to leak the goroutine
                case dst <- n:
                    n++
                }
            }
        }()
        return dst
    }

    ctx, cancel := context.WithCancel(context.Background())
    defer cancel() // cancel when we are finished consuming integers

    for n := range gen(ctx) {
        fmt.Println(n)
        if n == 5 {
            break
        }
    }
    // Output:
    // 1
    // 2
    // 3
    // 4
    // 5
}
|
场景模拟在程序中构建了一个子协程进行处理,尤其是针对非自然退出类型的func(有return,非阻塞型),利用cancel可以安全的关闭所有关联协程。 如果需要,可以再接收到通道关闭信息之后进行一些收尾和清理操作。
Case2: 使用timeout/或者deadline直接关闭context
 1
 2
 3
 4
 5
 6
 7
 8
 9
10
11
12
13
14
15
16
17
18
19
|
func ExampleWithDeadline() {
    d := time.Now().Add(shortDuration)
    ctx, cancel := context.WithDeadline(context.Background(), d)

    // Even though ctx will be expired, it is good practice to call its
    // cancellation function in any case. Failure to do so may keep the
    // context and its parent alive longer than necessary.
    defer cancel()

    select {
    case <-time.After(1 * time.Second):
        fmt.Println("overslept")
    case <-ctx.Done():
        fmt.Println(ctx.Err())
    }

    // Output:
    // context deadline exceeded
}
|
这里说明一点,虽然timer内部到时后会直接调用内置的cancel方法,但是就像我们总是会显示的释放资源一样,养成随手调用defer cancel()的习惯,会让程序更加健壮。
要知道,如果自己的ctx没有被正确的cancel掉,那这个ctx引用就会在parent的child列表中存在比预期更长的时间,导致不必要的资源占用,或引发一些与预期不相符的现象。
Case3: 利用context传递值
 1
 2
 3
 4
 5
 6
 7
 8
 9
10
11
12
13
14
15
16
17
18
19
20
21
|
func ExampleWithValue() {
    type favContextKey string

    f := func(ctx context.Context, k favContextKey) {
        if v := ctx.Value(k); v != nil {
            fmt.Println("found value:", v)
            return
        }
        fmt.Println("key not found:", k)
    }

    k := favContextKey("language")
    ctx := context.WithValue(context.Background(), k, "Go")

    f(ctx, k)
    f(ctx, favContextKey("color"))

    // Output:
    // found value: Go
    // key not found: color
}
|
在上下文中可以方便的传递键值对。
3.3.7 [思考] Context 在字节跳动的应用
我们一般排查问题的时候,总会让QA抓个包,把 logid 找出来,然后去排查问题,那我们需要思考一下为什么我们只需要一个 logid 就能把一整条调用链串联起来,其实本质上就是依靠 Context 来传递信息,我们有一些固定的 key,存在 context 中串联整个链路,在调用下游服务的时候,会把这些 key 也带过去,故而完成了整条链路的串联。
如 logid 在 context 的 key 是 K_LOGID
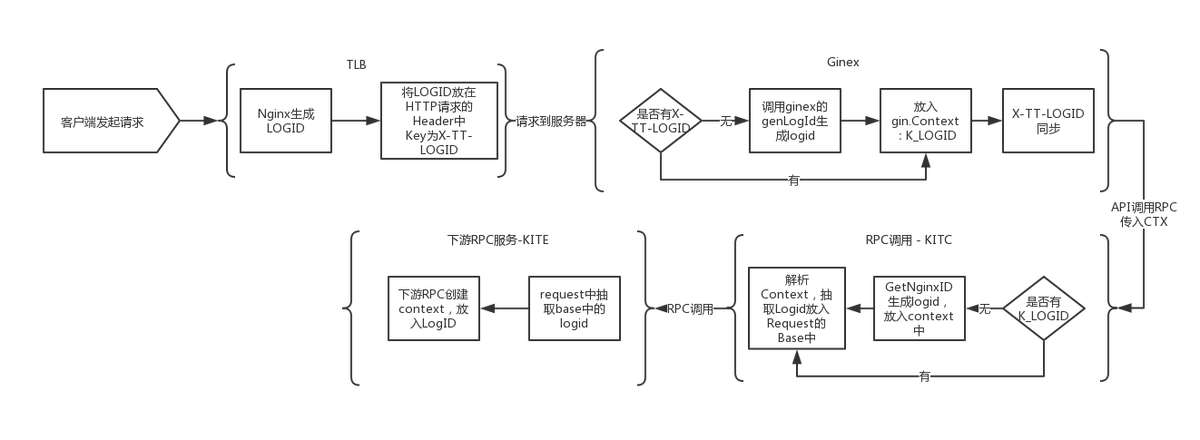
客户端发请求给TLB,TLB再请求后端的时候,会添加请求头x-tt-logid 到TTHeader(如果客户端请求带此header,TLB就不加),后端收到TLB的请求,发现请求头带有x-tt-logid,如果后端用的是公司统一的框架写的代码,后端就会在响应头中也加入这个x-tt-logid。这样下来,整条链路的http请求和响应的x-tt-logid始终保持一致,ms平台就可根据logid来查询数据包的走向。
流式日志如何传递的可以参考: Logid&日志详解
3.4 同步原语&锁
Go最大的特性是自带用户态线程 Goroutine,并发必然会带来一些数据竞争与并发安全的问题。Go 在 sync 包里面提供了一些同步的基础原语,我们挑一些常用的来了解一下。
3.4.1 Mutex
简介
互斥锁是并发程序中对共享资源进行访问控制的主要手段,多个 Goroutine 可能会竞争同一个共享资源,为了并发安全,我们用互斥锁把临界区代码锁上,在锁的持有人释放锁之前,其他竞争者不能获得锁。
对此 Go 语言提供了非常简单易用的 Mutex,Mutex 为一结构体类型,对外暴露两个方法 Lock() 和 Unlock() 分别用于加锁和解锁。
Mutex 定义在 $GOROOT/src/sync/mutex.go 中:
1
2
3
4
5
6
7
8
|
// A Mutex is a mutual exclusion lock.
// The zero value for a Mutex is an unlocked mutex.
//
// A Mutex must not be copied after first use.
type Mutex struct {
    state int32
    sema  uint32
}
|
-
state 表示当前互斥锁的状态
-
sema 是用于控制锁状态的信号量
互斥锁的状态内存布局为:
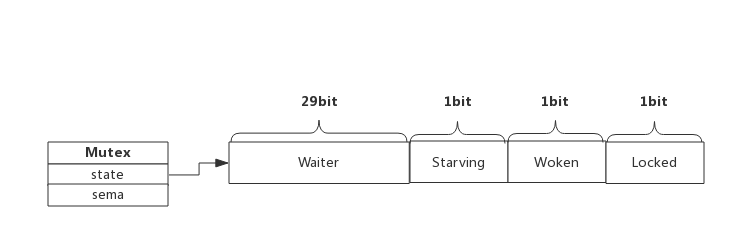
在默认情况下,互斥锁的所有状态位都是 0,int32 中的不同位分别表示了不同的状态:
-
mutexLocked — 表示互斥锁的锁定状态;
-
mutexWoken — 表示从正常模式被从唤醒;
-
mutexStarving — 当前的互斥锁进入饥饿状态;
-
waitersCount — 当前互斥锁上等待的 Goroutine 个数;
在了解加锁和解锁前,我们需要先了解一下互斥锁的正常模式与饥饿模式:
-
正常模式:锁的等待者会按照先进先出的顺序获取锁。但是刚被唤起的 Goroutine 与新创建的 Goroutine 竞争时,大概率会获取不到锁,为了减少这种情况的出现,一旦 Goroutine 超过 1ms 没有获取到锁,它就会将当前互斥锁切换饥饿模式,防止部分 Goroutine 被饿死。
-
饥饿模式:互斥锁会直接交给等待队列最前面的 Goroutine。新的 Goroutine 在该状态下不能获取锁、也不会进入自旋状态,它们只会在队列的末尾等待。如果一个 Goroutine 获得了互斥锁并且它在队列的末尾或者它等待的时间少于 1ms,那么当前的互斥锁就会切换回正常模式。
与饥饿模式相比,正常模式下的互斥锁能够提供更好地性能,饥饿模式的能避免 Goroutine 由于陷入等待无法获取锁而造成的高尾延时。
我们来看一下加锁和解锁的主要实现。
加锁
互斥锁的加锁主要靠 Lock() 函数完成,核心逻辑为:
 1
 2
 3
 4
 5
 6
 7
 8
 9
10
11
12
|
// Lock locks m.
// If the lock is already in use, the calling goroutine
// blocks until the mutex is available.
func (m *Mutex) Lock() {
    // Fast path: grab unlocked mutex.
    if atomic.CompareAndSwapInt32(&m.state, 0, mutexLocked) {
        // ...
        return
    }
    // Slow path (outlined so that the fast path can be inlined)
    m.lockSlow()
}
|
接下来我们了解一下什么是自旋锁:
自旋是一种多线程同步机制,当前的进程在进入自旋的过程中会一直保持 CPU 的占用,持续检查某个条件是否为真。在多核的 CPU 上,自旋可以避免 Goroutine 的切换,使用恰当会对性能带来很大的增益,但是使用的不恰当就会拖慢整个程序,Goroutine 进入自旋的条件非常苛刻:
-
互斥锁只有在普通模式才能进入自旋;
-
runtime.sync_runtime_canSpin 需要返回 true:
- 运行在多 CPU 的机器上;
- 当前 Goroutine 为了获取该锁进入自旋的次数小于四次;
- 当前机器上至少存在一个正在运行的处理器 P 并且处理的运行队列为空;
处理了自旋相关的特殊逻辑之后,互斥锁会根据上下文计算当前互斥锁最新的状态。几个不同的条件分别会更新 state 字段中存储的不同信息 — mutexLocked、mutexStarving、mutexWoken 和 mutexWaiterShift:
 1
 2
 3
 4
 5
 6
 7
 8
 9
10
11
12
13
14
15
16
17
18
19
20
21
22
23
24
|
// 部分 lockSlow() 代码
new := old
// Don't try to acquire starving mutex, new arriving goroutines must queue.
if old&mutexStarving == 0 {
    new |= mutexLocked
}
if old&(mutexLocked|mutexStarving) != 0 {
    new += 1 << mutexWaiterShift
}
// The current goroutine switches mutex to starvation mode.
// But if the mutex is currently unlocked, don't do the switch.
// Unlock expects that starving mutex has waiters, which will not
// be true in this case.
if starving && old&mutexLocked != 0 {
    new |= mutexStarving
}
if awoke {
    // The goroutine has been woken from sleep,
    // so we need to reset the flag in either case.
    if new&mutexWoken == 0 {
        throw("sync: inconsistent mutex state")
    }
    new &^= mutexWoken
}
|
计算完新的互斥锁状态后,会使用 CAS 函数 atomic.CompareAndSwapInt32 更新状态
 1
 2
 3
 4
 5
 6
 7
 8
 9
10
11
12
13
14
15
16
17
18
19
20
21
22
23
24
25
26
27
28
29
30
31
32
33
34
35
36
37
|
if atomic.CompareAndSwapInt32(&m.state, old, new) {
    if old&(mutexLocked|mutexStarving) == 0 {
        break // 通过 CAS 函数获取了锁
    }
    // If we were already waiting before, queue at the front of the queue.
    queueLifo := waitStartTime != 0
    if waitStartTime == 0 {
        waitStartTime = runtime_nanotime()
    }
    runtime_SemacquireMutex(&m.sema, queueLifo, 1)
    starving = starving || runtime_nanotime()-waitStartTime > starvationThresholdNs
    old = m.state
    if old&mutexStarving != 0 {
        // If this goroutine was woken and mutex is in starvation mode,
        // ownership was handed off to us but mutex is in somewhat
        // inconsistent state: mutexLocked is not set and we are still
        // accounted as waiter. Fix that.
        if old&(mutexLocked|mutexWoken) != 0 || old>>mutexWaiterShift == 0 {
            throw("sync: inconsistent mutex state")
        }
        delta := int32(mutexLocked - 1<<mutexWaiterShift)
        if !starving || old>>mutexWaiterShift == 1 {
            // Exit starvation mode.
            // Critical to do it here and consider wait time.
            // Starvation mode is so inefficient, that two goroutines
            // can go lock-step infinitely once they switch mutex
            // to starvation mode.
            delta -= mutexStarving
        }
        atomic.AddInt32(&m.state, delta)
        break
    }
    awoke = true
    iter = 0
} else {
    old = m.state
}
|
如果 CAS 获取锁失败,会使用 runtime_SemacquireMutex 通过信号量保证资源不会被两个 Goroutine 获取。runtime_SemacquireMutex 会在方法中不断尝试获取锁并陷入休眠等待信号量的释放,一旦当前 Goroutine 可以获取信号量,它就会立刻返回
总结一下,互斥锁的加锁过程比较复杂,它涉及自旋、信号量以及调度等概念:
-
如果互斥锁处于初始化状态,会通过置位 mutexLocked 加锁;
-
如果互斥锁处于 mutexLocked 状态并且在普通模式下工作,会进入自旋,执行 30 次 PAUSE 指令消耗 CPU 时间等待锁的释放;
-
如果当前 Goroutine 等待锁的时间超过了 1ms,互斥锁就会切换到饥饿模式;
-
互斥锁在正常情况下会通过 runtime.sync_runtime_SemacquireMutex 将尝试获取锁的 Goroutine 切换至休眠状态,等待锁的持有者唤醒;
-
如果当前 Goroutine 是互斥锁上的最后一个等待的协程或者等待的时间小于 1ms,那么它会将互斥锁切换回正常模式;
解锁
解锁的过程与加锁相比,会比较简单:
1
2
3
4
5
6
7
8
9
|
func (m *Mutex) Unlock() {
    // ...
    new := atomic.AddInt32(&m.state, -mutexLocked)
    if new != 0 {
        // Outlined slow path to allow inlining the fast path.
        // To hide unlockSlow during tracing we skip one extra frame when tracing GoUnblock.
        m.unlockSlow(new)
    }
}
|
-
首先通过原子操作快速解锁 mutexLocked 标志位
-
如果函数返回的新状态不是0,就会调用 unlockSlow 来慢速解锁
 1
 2
 3
 4
 5
 6
 7
 8
 9
10
11
12
13
14
15
16
17
18
19
20
21
22
23
24
25
26
27
28
29
30
31
32
33
|
func (m *Mutex) unlockSlow(new int32) {
    if (new+mutexLocked)&mutexLocked == 0 {
        throw("sync: unlock of unlocked mutex")
    }
    if new&mutexStarving == 0 { // 正常模式
        old := new
        for {
            // If there are no waiters or a goroutine has already
            // been woken or grabbed the lock, no need to wake anyone.
            // In starvation mode ownership is directly handed off from unlocking
            // goroutine to the next waiter. We are not part of this chain,
            // since we did not observe mutexStarving when we unlocked the mutex above.
            // So get off the way.
            if old>>mutexWaiterShift == 0 || old&(mutexLocked|mutexWoken|mutexStarving) != 0 {
                return
            }
            // Grab the right to wake someone.
            new = (old - 1<<mutexWaiterShift) | mutexWoken
            if atomic.CompareAndSwapInt32(&m.state, old, new) {
                runtime_Semrelease(&m.sema, false, 1)
                return
            }
            old = m.state
        }
    } else { // 饥饿模式
        // Starving mode: handoff mutex ownership to the next waiter, and yield
        // our time slice so that the next waiter can start to run immediately.
        // Note: mutexLocked is not set, the waiter will set it after wakeup.
        // But mutex is still considered locked if mutexStarving is set,
        // so new coming goroutines won't acquire it.
        runtime_Semrelease(&m.sema, true, 1)
    }
}
|
总结
-
不同 goroutine 可以 Unlock 同一个 Mutex,但是 Unlock 一个无锁状态的 Mutex 就会报错。,如刚源码讲的 sync: unlock of unlocked mutex
-
Mutex 不是可重入锁,Mutex 不会记录持有锁的协程的信息,所以如果连续两次 Lock 操作,就直接死锁了。
-
正常模式中,等待者按照 FIFO 的顺序排队被唤醒来获取锁,但是它有时候并不能获取 mutex, 它需要和新到来的 goroutine 们竞争 mutex 的使用权。 新到来的 goroutine 存在一个优势,它们已经在 CPU 上运行且它们数量很多, 因此一个被唤醒的等待者有很大的概率获取不到锁,在这种情况下它处在等待队列的前面
-
如果一个 goroutine 等待 mutex 释放的时间超过 1ms, mutex 会切换到饥饿模式。饥饿模式中,mutex 的所有权直接从解锁的 goroutine 递交到等待队列中排在最前方的 goroutine。 新到达的 goroutine 们不要尝试去获取 mutex,即使它看起来是在解锁状态,也不要试图自旋, 而是排到等待队列的尾部。
-
Mutex 千万不能被复制,复制的时候会将原锁的 state 值也进行复制。复制之后,一个新 Mutex 可能莫名处于持有锁、唤醒或者饥饿状态,甚至等阻塞等待数量远远大于0。而原锁 Unlock 的时候,却不会影响复制锁。
3.4.2 RWMutex 读写锁
什么是 RWMutex?
用法如:
 1
 2
 3
 4
 5
 6
 7
 8
 9
10
11
12
13
14
15
|
func Read(lock sync.RWMutex) {
    go func() {
        lock.RLock()
        // read
        lock.RUnlock()
    }()
}

func Write(lock sync.RWMutex) {
    go func() {
        lock.Lock()
        // write
        lock.Unlock()
    }()
}
|
读写锁相对于互斥锁来说粒度更细,使用读写锁可以并发读,但是不能并发读写,或者并发写写
既然有了互斥锁,为啥要有读写锁?我们常见的业务场景中,有很多大部分都是读多写少,我们可以分离读写操作,从而提高服务性能,我们先看一下读写锁定义 $GOROOT/src/sync/rwmutex.go:
1
2
3
4
5
6
7
|
type RWMutex struct {
    w           Mutex  // held if there are pending writers
    writerSem   uint32 // semaphore for writers to wait for completing readers
    readerSem   uint32 // semaphore for readers to wait for completing writers
    readerCount int32  // number of pending readers
    readerWait  int32  // number of departing readers
}
|
-
w 复用互斥锁的能力
-
writerSem 和 readerSem 分别用于写等待读,和读等待写
-
readerCount 存储了当前正在读操作的数量
-
readerWait 表示当前写操作被阻塞时等待的读操作的个数
由于服用了互斥锁的代码,读写锁实现相对比较简单。
写锁
加锁
1
2
3
4
5
|
func (rw *RWMutex) Lock() {
        rw.w.Lock()
        r := atomic.AddInt32(&rw.readerCount, -rwmutexMaxReaders) + rwmutexMaxReaders
        if r != 0 && atomic.AddInt32(&rw.readerWait, r) != 0 {runtime_SemacquireMutex(&rw.writerSem, false, 0)}
}
|
- 先调用结构体持有的互斥锁锁上,获取到互斥锁之后
- 使用 AddInt32 阻塞后续的读操作
- 如果计算之后当前仍然有其他 goroutine 持有读锁,那么就调用
runtime_SemacquireMutex 休眠当前的 goroutine 等待所有的读操作完成
解锁
 1
 2
 3
 4
 5
 6
 7
 8
 9
10
11
12
13
14
15
16
17
18
19
20
21
22
23
|
func (rw *RWMutex) Unlock() {
    if race.Enabled {
        _ = rw.w.state
        race.Release(unsafe.Pointer(&rw.readerSem))
        race.Disable()
    }

    // Announce to readers there is no active writer.
    r := atomic.AddInt32(&rw.readerCount, rwmutexMaxReaders)
    if r >= rwmutexMaxReaders {
        race.Enable()
        throw("sync: Unlock of unlocked RWMutex")
    }
    // Unblock blocked readers, if any.
    for i := 0; i < int(r); i++ {
        runtime_Semrelease(&rw.readerSem, false, 0)
    }
    // Allow other writers to proceed.
    rw.w.Unlock()
    if race.Enabled {
        race.Enable()
    }
}
|
-
解锁的操作,会先调用 atomic.AddInt32(&rw.readerCount, rwmutexMaxReaders) 函数将 readerCount 变回正数,释放读锁
-
通过 for 循环释放所有因为获取读锁而陷入等待的 Goroutine
-
调用自己持有的互斥锁解锁,释放写锁
读锁
加锁
1
2
3
4
5
|
func (rw *RWMutex) RLock() {
    if atomic.AddInt32(&rw.readerCount, 1) < 0 {
        runtime_SemacquireMutex(&rw.readerSem, false, 0)
    }
}
|
- 该方法会通过
sync/atomic.AddInt32 将 readerCount 加一
- 如果该方法返回负数,代表其他 Goroutine 获得了写锁,当前 Goroutine 就会调用
runtime.sync_runtime_SemacquireMutex 陷入休眠等待锁的释放;
- 如果该方法的结果为非负数,则代表没有 Goroutine 获得写锁,当前方法会成功返回;
解锁
1
2
3
4
5
|
func (rw *RWMutex) RUnlock() {
    if r := atomic.AddInt32(&rw.readerCount, -1); r < 0 {
        rw.rUnlockSlow(r)
    }
}
|
该方法会先减少正在读资源的 readerCount 整数,根据 sync/atomic.AddInt32 的返回值不同会分别进行处理:
 1
 2
 3
 4
 5
 6
 7
 8
 9
10
11
|
func (rw *RWMutex) rUnlockSlow(r int32) {
    if r+1 == 0 || r+1 == -rwmutexMaxReaders {
        race.Enable()
        throw("sync: RUnlock of unlocked RWMutex")
    }
    // A writer is pending.
    if atomic.AddInt32(&rw.readerWait, -1) == 0 {
        // The last reader unblocks the writer.
        runtime_Semrelease(&rw.writerSem, false, 1)
    }
}
|
sync.RWMutex.rUnlockSlow 会减少获取锁的写操作等待的读操作数 readerWait 并在所有读操作都被释放之后触发写操作的信号量 writerSem,该信号量被触发时,调度器就会唤醒尝试获取写锁的 Goroutine。
总结
- 读写锁建立在互斥锁的基础之上,如果业务场景可以做到读写分离,那使用读写锁可以大大降低锁的持有时间
3.4.3 WaitGroup
WaitGroup 可以说是在我们的业务代码里非常常见了,常见的一种场景是我们需要调用多个 rpc 请求向下游获取数据,这些请求没有先后顺序,可以并发调用,我们需要等这些 goroutine 都执行完毕之后,再进行下一步操作,一种常见的用法是:
 1
 2
 3
 4
 5
 6
 7
 8
 9
10
11
12
13
14
15
|
func worker(i int) {
        fmt.Println("worker: ", i)
}

func main() {
        var wg sync.WaitGroup
        for i := 0; i < 10; i++ {
                wg.Add(1)
                go func(i int) {
                        defer wg.Done()
                        worker(i)
                }(i)
        }
        wg.Wait()
}
|
我们从源码角度简单看一下,首先 $goroot/src/sync/waitgroup.go 里面定义了 waitgroup
 1
 2
 3
 4
 5
 6
 7
 8
 9
10
|
type WaitGroup struct {
    noCopy noCopy

    // 64-bit value: high 32 bits are counter, low 32 bits are waiter count.
    // 64-bit atomic operations require 64-bit alignment, but 32-bit
    // compilers do not ensure it. So we allocate 12 bytes and then use
    // the aligned 8 bytes in them as state, and the other 4 as storage
    // for the sema.
    state1 [3]uint32
}
|
state 方法实现了操作 state1,取出其中的 counter 和 信号量,state 方法返回 counter 和信号量,通过 uintptr(unsafe.Pointer(&wg.state1))%8 == 0 来判断是否 8 字节对齐
1
2
3
4
5
6
7
|
func (wg *WaitGroup) state() (statep *uint64, semap *uint32) {
    if uintptr(unsafe.Pointer(&wg.state1))%8 == 0 {
        return (*uint64)(unsafe.Pointer(&wg.state1)), &wg.state1[2]
    } else {
        return (*uint64)(unsafe.Pointer(&wg.state1[1])), &wg.state1[0]
    }
}
|
Add()
 1
 2
 3
 4
 5
 6
 7
 8
 9
10
11
12
13
14
15
16
17
18
19
20
21
22
23
24
25
26
27
28
29
30
31
32
33
34
35
36
37
38
|
func (wg *WaitGroup) Add(delta int) {
    // 先从 state 当中把数据和信号量取出来
    statep, semap := wg.state()

    // 在 waiter 上加上 delta 值
    state := atomic.AddUint64(statep, uint64(delta)<<32)
    // 取出当前的 counter
    v := int32(state >> 32)
    // 取出当前的 waiter,正在等待 goroutine 数量
    w := uint32(state)

    // counter 不能为负数
    if v < 0 {
        panic("sync: negative WaitGroup counter")
    }
    // 这里属于防御性编程
    // w != 0 说明现在已经有 goroutine 在等待中,说明已经调用了 Wait() 方法
    // 这时候 delta > 0 && v == int32(delta) 说明在调用了 Wait() 方法之后又想加入新的等待者
    // 这种操作是不允许的
    if w != 0 && delta > 0 && v == int32(delta) {
        panic("sync: WaitGroup misuse: Add called concurrently with Wait")
    }
    // 如果当前没有人在等待就直接返回,并且 counter > 0
    if v > 0 || w == 0 {
        return
    }

    // 这里也是防御 主要避免并发调用 add 和 wait
    if *statep != state {
        panic("sync: WaitGroup misuse: Add called concurrently with Wait")
    }

    // 唤醒所有 waiter
    *statep = 0
    for ; w != 0; w-- {
        runtime_Semrelease(semap, false, 0)
    }
}
|
-
首先更新 waitgroup 中的计数器 counter
-
方法传入的参数可以为负数,但是计数器只能是非负数,一旦出现负数就会发生程序崩溃。当调用计数器归零,即所有任务都执行完成时,才会通过
-
sync.runtime_Semrelease 唤醒处于等待状态的 Goroutine
Done()
只是 add 的简单封装,代表可以从 group 中删除这个 Goroutine 了
1
2
3
|
func (wg *WaitGroup) Done() {
    wg.Add(-1)
}
|
Wait()
 1
 2
 3
 4
 5
 6
 7
 8
 9
10
11
12
13
14
15
16
17
18
19
20
21
22
23
24
25
26
|
func (wg *WaitGroup) Wait() {
    // 先从 state 当中把数据和信号量的地址取出来
    statep, semap := wg.state()

    for {
        // 这里去除 counter 和 waiter 的数据
        state := atomic.LoadUint64(statep)
        v := int32(state >> 32)
        w := uint32(state)

        // counter = 0 说明没有在等的,直接返回就行
        if v == 0 {
            // Counter is 0, no need to wait.
            return
        }

        // waiter + 1,调用一次就多一个等待者,然后休眠当前 goroutine 等待被唤醒
        if atomic.CompareAndSwapUint64(statep, state, state+1) {
            runtime_Semacquire(semap)
            if *statep != 0 {
                panic("sync: WaitGroup is reused before previous Wait has returned")
            }
            return
        }
    }
}
|
- 会在计数器大于 0 并且不存在等待的 Goroutine 时,调用
runtime.sync_runtime_Semacquire 陷入睡眠。
总结
-
WaitGroup 可以用于一个 goroutine 等待多个 goroutine 干活完成,也可以多个 goroutine 等待一个 goroutine 干活完成,是一个多对多的关系
-
通过 wait 可以等待所有子 goroutine 执行完毕的原理是,runtime_Semrelease 可以把当前 goroutine 唤醒,runtime_Semacquire 可以把当前 goroutine 休眠
-
Done() 只是对 Add() 的简单封装,我们可以向 Add() 方法传入任意复数,使计数器快速归零以唤醒等待的 goroutine.
-
Add(n>0) 方法应该在启动 goroutine 之前调用,然后在 goroution 内部调用 Done 方法
-
WaitGroup 必须在 Wait 方法返回之后才能再次使用
3.4.4 Once
简介
Once 也是业务代码非常常用的一个操作,作用是可以保证 Go 程序运行期间的某段代码只会执行一次,用法可以是,一般我们在初始化一个外部依赖组件的 client 时,使用 once 可以保证单例,只初始化一次
1
2
3
4
|
once := sync.Once{}
once.Do(func() {
    // ...
})
|
可以看一下定义 $goroot/src/sync/once.go:
1
2
3
4
5
6
7
8
9
|
type Once struct {
    // done indicates whether the action has been performed.
    // It is first in the struct because it is used in the hot path.
    // The hot path is inlined at every call site.
    // Placing done first allows more compact instructions on some architectures (amd64/386),
    // and fewer instructions (to calculate offset) on other architectures.
    done uint32
    m    Mutex
}
|
- 每一个 once 里面都只包含一个用于标识代码块是否执行过的 done 以及一个互斥锁 mutex
只有一个对外暴露的 Do 方法:
1
2
3
4
5
6
|
func (o *Once) Do(f func()) {
    if atomic.LoadUint32(&o.done) == 0 {
        // Outlined slow-path to allow inlining of the fast-path.
        o.doSlow(f)
    }
}
|
1
2
3
4
5
6
7
8
|
func (o *Once) doSlow(f func()) {
    o.m.Lock()
    defer o.m.Unlock()
    if o.done == 0 {
        defer atomic.StoreUint32(&o.done, 1)
        f()
    }
}
|
-
为当前 Goroutine 获取互斥锁;
-
执行传入的无入参函数;
-
运行延迟函数调用,将成员变量 done 更新成 1
sync.Once 会通过成员变量 done 确保函数不会执行第二次。
总结
-
Once 的核心就是给 done 加了个互斥锁,且同时用了 atomic 保证原子性。
-
讲这个 Once() 并不是为了让大家了解什么深奥的设计原理,只是想举个例子,这个 Once 的时间,实际代码我数了数不超过 20 行,但就是这么点逻辑简单的代码,也可以写进标准库
-
想引导大家做需求的时候,如果有问题可以多看看源码,有时候源码没我们想象的那么复杂(虽然有的确实很复杂),也可以实现的很简单。简单且健壮。
3.6 常见的坑
列一些常用的坑
-
for range 的坑:
 1
 2
 3
 4
 5
 6
 7
 8
 9
10
11
12
13
14
15
16
17
18
19
20
21
22
|
type student struct {
    Name string
    Age  int
}

func main() {
    var stus []student
    stus = []student{
        {Name: "one", Age: 18},
        {Name: "two", Age: 19},
    }
    data := make(map[int]*student)
    for i, v := range stus {
        data[i] = &v //应该改为:data[i] = &stus[i]
    }
    for i, v := range data {
        fmt.Printf("key=%d, value=%v \n", i, v)
    }
}
// output:
// key=0, value=&{two 19}
// key=1, value=&{two 19}
|
这个坑由来已久,并在至少在线上我亲眼目睹的就有好几次,原因是 golang 的 range 实现中,并不是取的遍历的列表的原始地址,而是每次遍历的这个 v 都是对同一个元素的遍历赋值,也就是说如果直接对v取地址,最终只会拿到一个地址,而对应的值就是最后遍历的那个元素所附给v的值。
解决方案可以使,在 for 循环内部我们再定义一个变量,然后使用新变量的地址。
-
Go 语言中不存在未初始化的变量
变量定义基本方式为: var 变量名字 类型 = 表达式
其中类型和表达式均可省略,如果初始化表达式被省略,将用零值初始化该变量。
 1
 2
 3
 4
 5
 6
 7
 8
 9
10
11
12
|
type Student struct {
}

func (s *Student) printName() {
    fmt.Println("Tom") // Tom
}

func main() {
    var s *Student
    fmt.Println("s == nil?", s == nil) // s == nil? true
    s.printName()
}
|
上述代码是可以正常输出的,这在 Java 等面向对象语言中是不可思议的。Golang 不是真正意义上的面向对象语言,Golang 中的对象其实是 struct 实体。
-
defer 的执行时机
对于 defer 延迟执行的函数,传参在声明的时候就会求出具体值,而不是在执行时才求值。
 1
 2
 3
 4
 5
 6
 7
 8
 9
10
|
func foo(x int) {
   fmt.Println("x in foo:", x) // x in foo: 1
}

func main() {
   x := 1
   defer foo(x)
   x += 1
   fmt.Println("x in main:", x) // x in main: 2
}
|
-
json 反序列数字到 interface{} 类型的值中时,默认解析为 float64 类型
1
2
3
4
5
6
7
8
|
func main() {
   str := `{"name": "Tom", "age": 20}`
   var mp map[string]interface{}

   json.Unmarshal([]byte(str), &mp)
   age := mp["Tom"].(int) // 报错:panic: interface conversion: interface {} is nil, not int
   fmt.Println(age)
}
|
-
map 中元素不可寻址
 1
 2
 3
 4
 5
 6
 7
 8
 9
10
11
12
|
type Student struct {
   Name  string
   Score int
}

func main() {
   students := map[string]Student{
      "Tom": {"Tom", 59},
   }
   fmt.Printf("%p\n", &students["Tom"]) // 编译失败,Cannot take the address of 's["Tom"]'
   students["Tom"].Score = 90 // 编译失败,Cannot assign to 'students["Tom"].Score'
}
|
map 中元素并不是一个变量,而是一个值。因此,不能对 map 中元素进行取址操作。
3.7 工欲善其事,必先利其器
我们在日常开发中,不仅需要掌握 golang 的一些基础知识,还需要了解一些常用的第三方库,合理正确的使用第三方库能极大提升我们的工作效率,让你早点下班,下面介绍一些日常可以使用到的轮子们。
- 写单测神器mockey
在字节内部,也叫做 mockito ,现已在 github 开源,代码维护在: https://github.com/bytedance/mockey
Mockey 是一款简单易用的 Golang 打桩工具库,能够快速方便地进行函数、变量的 mock,目前在字节跳动各业务的单元测试编写中应用较为广泛,其底层是通过运行时改写函数指令实现的猴子补丁(Monkey Patch),实际编写单测的过程中,建议结合 Convey 库一起使用。
- go-funk
地址:https://github.com/thoas/go-funk
Go-funk 是基于反射(reflect )实现的一个现代Go工具库,封装了对slice/map/struct/string等的操作。合理使用可以大大提高编码效率。
字节内部也有相似的库,大家选择使用:
- 优雅 retry
https://code.byted.org/gopkg/retry
不用自己编写丑陋的 retrey 函数,框架还会对 retry 操作进行打点
- SJSON
地址:https://github.com/tidwall/sjson
直接操作 JSON 本身,无需 Marshal 与 Unmarshal
-
LocalCache:https://code.byted.org/gopkg/localcache
-
Confx: https://code.byted.org/prek/confx,方便的读取 tcc、byteconf 的配置
-
LoaderFramework
- Conload https://code.byted.org/toutiao/conload
- https://code.byted.org/gopkg/facility/tree/master/parallel_loader
- https://code.byted.org/gopkg/jobmgr
-
goroutine控制:
- https://code.byted.org/gopkg/gopool
- https://code.byted.org/aweme-go/dsync
- Go Routine Pool
- Go Task Schedule
- https://code.byted.org/gopkg/parallel
-
Codeverse Go推荐公共组件介绍
四、总结
本文起名为 杂烩,是因为 Golang 中的知识实在太多了,不是一篇两篇文章能写完的,我们也没有必要为了完整的学完 Golang ,从头到尾所有的东西都学一遍。在日常的业务开发中,我们可能会遇到一些问题,探索这个问题的过程中,可能会遇到这些知识,然后我们再去探索、学习,带着问题去学习的效率会比漫无目的的看高很多。
本文列举了一些我觉得比较重要的 golang 的一些数据结构,以及常用的比较重要的标准库,简单的说明一下原理,没有死抠到特别细节,我们需要大致对这些常用组件有一个把控,才能帮助我们写出更健壮的代码。
还有很多知识,比如 golang并发、调度器、垃圾回收等知识,涉及知识比较难,我应该没办法讲的特别好,所以本文并没有涉及这些知识,对 golang 有兴趣的同学可以深入探索一下这些知识。
文末附的一些学习资料,对我准备本文特别有帮助,大家有兴趣也可以点开看看(收藏了就是会了).
学习资料推荐&参考资料
- 字节跳动青训营
- Golang 进阶训练营系列
- Golang 进阶训练营-语言篇
- Golang 进阶训练营-组件篇
- Golang 进阶训练营-工程实践篇
- 《Go语言高性能编程》
- 《Go语言高级编程》
- 《Go语言设计与实现》
- 《Go语言圣经》
- 《Go语言定制指南》
- 《Go专家编程》
- 《Go语言101》
- 《Go 语言原本》
- 《深入Go语言之旅》
- 《Go 语言编程之旅》
- 《Go 语言设计哲学》
- https://lailin.xyz/categories/Go%E8%BF%9B%E9%98%B6%E8%AE%AD%E7%BB%83%E8%90%A5/ Go进阶训练营,一个博客,写的不错
- https://www.liwenzhou.com/archives/ 李文周的博客,里面有质量比较高的golang教程
- https://go.dev/blog/ Golang 官方博客,可以看一些 golang 的最新动态
- https://github.com/talkgo/night Go 夜读是一个开源的 go语言学习组织,有很多非常有质量的分享课程
- https://space.bilibili.com/567195437/video?tid=0&page=1&keyword=&order=pubdate 幼麟实验室,会制作一些浅显易懂的动画,帮助更好的理解Go语言
- https://github.com/uber-go/guide/blob/master/style.md#functional-options go风格指南
最后修改于 2022-10-24

本作品采用
知识共享署名-非商业性使用-相同方式共享 4.0 国际许可协议进行许可。